Web基础之Spring IoC
Spring之IoC
概念
IoC:Inversion of Control,中文通常翻译为“控制反转”,它还有一个别名叫做依赖注入(Dependency Injection)。但实际上依赖注入控制反转的一种表达方式(还有一种叫依赖查找)。什么是控制反转呢,简单来说就是本来上层建筑依赖下层建筑,下载通过依赖注入是下层建筑依附于上层建筑。具体表现就是通过注入的方式,为高级类(接口)添加依赖,注入方式可以为构造方法、set方法和接口注入(用得少,侵入性高)。
而Spring就一种是典型的IoC容器(用来管理bean),并且可以帮助我们管理注入,省去许多麻烦(感觉有点像JVM帮我们管理内存一样)
推荐看一下《Spring揭秘》这本书,讲的非常不错。
快速入门
首先导入IoC相关依赖: spring-context
<dependency>
    <groupId>org.springframework</groupId>
    <artifactId>spring-context</artifactId>
    <version>5.1.9.RELEASE</version>
</dependency>
然后是service和dao层的接口及其实现类: 接口及其实现类
public interface UserDao {
    public void save();
}

public class UserDaoImpl implements UserDao {
    @Override
    public void save() {
        System.out.println("保存用户信息");
    }
}

public interface UserService {
    public void register();
}

public class UserServiceImpl implements UserService {
    @Override
    public void register() {
        System.out.println("注册");
    }
}
再然后是xml配置: applicationContext.xml
<?xml version="1.0" encoding="UTF-8"?>
<beans xmlns="http://www.springframework.org/schema/beans"
       xmlns:xsi="http://www.w3.org/2001/XMLSchema-instance"
       xsi:schemaLocation="
       http://www.springframework.org/schema/beans
       http://www.springframework.org/schema/beans/">
    <!--
        定义bean
            id:唯一标识符
            class:bean所对应的类
    -->
    <bean id="userService" class="com.bilibili.service.impl.UserServiceImpl"></bean>
    <bean id="userDao" class="com.bilibili.dao.impl.UserDaoImpl"></bean>
</beans>
通过spring工厂获取定义的JavaBean:
//加载配置文件,获取spring工厂,从容器中获取dao和service的实现类
ApplicationContext ac = new ClassPathXmlApplicationContext("applicationContext.xml");
//从容器中获取service
UserService accountService = (UserService) ac.getBean("userService");
System.out.println(accountService);
//从容器中获取dao
UserDao userDao = (UserDao) ac.getBean("userDao");
System.out.println(userDao);
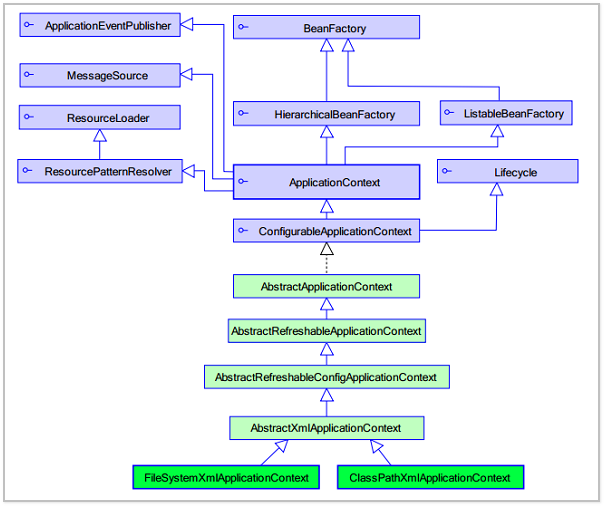
放一张被转烂了的图:

可以看到BeanFactory是工厂的顶层接口,也就是帮助我们管理bean的,ApplicationContext是其子接口。当然,ApplicationContext除了具有BeanFactory的所有功能之外,还有国际化支持。统一资源加载策略、容器内时间发布的特性。同时,两者对于bean的创建时机也不一样,BeanFactory在需要的时候(调用getbean方法)时创建,ApplicationContext会在读取配置之后立即创建。
上面给出了ApplicationContext的使用方法,BeanFactory则不太一样(XmlBeanFactory在3.1之后已过时):
Resource resource=new ClassPathResource("applicationContext.xml");
BeanFactory factory = new DefaultListableBeanFactory();
BeanDefinitionReader bdr = new XmlBeanDefinitionReader((BeanDefinitionRegistry) factory);
bdr.loadBeanDefinitions(resource);
ApplicationContext 接口的实现类非的三种实现类:
- ClassPathXmlApplicationContext:它是从类的根路径下加载配置文件,一般使用这种(类根路径为编译后class)
- FileSystemXmlApplicationContext:它是从磁盘路径上加载配置文件,配置文件可以在磁盘的任意位置。
- AnnotationConfigApplicationContext: 注解实现类。
bean标签
bean标签的属性:
id:给对象在容器中提供的唯一标识,用于获取对象class:指定类的全限定类名。用于反射创建对象。默认情况下调用无参构造函数。scope:指定对象的作用范围。<br/>值:singleton:默认值,单例prototype:多例
request:WEB 项目中,Spring 创建一个 Bean 的对象,将对象存入到 request 域中.session:WEB 项目中,Spring 创建一个 Bean 的对象,将对象存入到 session 域中.global session:WEB 项目中,应用在 Portlet 环境.如果没有 Portlet 环境那么 globalSession 相当于 session.init-method:指定类中的初始化方法名称(生命周期相关)。destroy-method:指定类中销毁方法名称(生命周期相关)。
bean的生命周期:
- init-method: 配置bean创建时的初始化方法。
- destory-method:配置bean销毁时的销毁方法。
在ApplicationContext中:
| 周期 | 单例singleton | 多例prototype |
|---|---|---|
| 对象出生 | 当应用加载,创建容器时,对象就被创建了。 | 当使用对象时,创建新的对象实例(getBean被调用) |
| 对象存在 | 只要容器在,对象一直活着 | 只要对象在使用中,就一直活着 |
| 对象死亡 | 当应用卸载,销毁容器时,对象就被销毁了 | 当对象长时间不用时,被java的垃圾回收器回收了 |
创建bean的三种方式:
<!-- 默认无参构造,一般用这种 -->
<bean id="userService" class="com.bilibili.service.impl.UserServiceImpl"></bean>
工厂方式:
//静态工厂
public class BeansFacotory1 {
    public static Object getBeans(){
        return new UserServiceImpl();
    }
}
//示例工厂
public class BeansFacotory2 {
    public  Object getBeans(){
        return new UserServiceImpl();
    }
}
配置方式:
<!-- 静态工厂方法创建对象
     class:工厂类的全限定名
     factory-method:工厂的静态方法
    -->
<bean id="userService" class="com.bilibili.utils.BeansFacotory1" factory-method="getBeans"></bean>

<!-- 实例工厂方法创建对象-->
<!-- 首先配置工厂类的实例 -->
<bean id="beansFactory2" class="com.bilibili.utils.BeansFacotory2"></bean>
<!-- factory-bean:配置工厂类实例对象
     factory-method:工厂类中用于创建对象的方法
    -->
<bean id="userService" factory-bean="beansFactory2" factory-method="getBeans"></bean>
小声BB:工厂都有了还要你spring干啥
依赖注入
面试官:为什么使用spring?
应聘者:因为方便?
面试官:什么?
让spring来管理bean的确方便😂
构造方法注入
构造方法注入需要存在有参构造:
public class UserServiceImpl implements UserService {
    private String userName;
    private int age;
    private UserDao userDao;

    public UserServiceImpl(String userName, int age, UserDao userDao) {
        this.userName = userName;
        this.age = age;
        this.userDao = userDao;
    }
}在xml中使用constructor-arg标签进行注入:
<bean id="userService" class="com.bilibili.service.impl.UserServiceImpl">
    <!--
        如下3个属性是用来指定给象中的哪个具体属性赋值
        index: 通过下标来指定构造方法中的属性
        name:  通过参数名来指定构造方法中的属性
        type: 通过参数的类型(全限定名)来指定构造方法中的属性

        如下2个属性是用来指定给对象中的属性赋什么值
        value:  赋值基本类型的值  例如:string,int,double...
        ref :  被spring管理的其他bean类型。必须是xml中配置的bean
     -->
    <constructor-arg name="userName" value="王者荣耀"/>
    <constructor-arg name="age" value="18" />
    <constructor-arg name="userDao" ref="userDao" />
</bean>
<bean id="userDao" class="com.bilibili.dao.impl.UserDaoImpl"></bean>
set方法注入
一般使用这种,比构造方法更灵活。
<bean id="userService" class="com.bilibili.service.impl.UserServiceImpl">
    <!--
     property:set方法注入属性
     name:set方法的名字后面的内容,小写开头
        例如:setUserName -  userName
        底层: userName - UserName - setUserName
     value:基本属性类型的值  例如 String int...
     ref:被spring管理的bean类型的值
     -->
    <property name="userName" value="呜啦啦"/>
    <property name="age" value="20"/>
    <property name="userDao" ref="userDao"/>
</bean>
<bean id="userDao" class="com.bilibili.dao.impl.UserDaoImpl"></bean>
命名空间方式注入
其实也是set注入,只不过可以少些一些标签,没什么用。(因为可读性不强)
<!-- 需要在beans标签中添加命名空间:xmlns:p="http://www.springframework.org/schema/p" -->
<beans xmlns="http://www.springframework.org/schema/beans"
       xmlns:xsi="http://www.w3.org/2001/XMLSchema-instance"
       xmlns:p="http://www.springframework.org/schema/p"
       xsi:schemaLocation="
        http://www.springframework.org/schema/beans http://www.springframework.org/schema/beans/spring-beans.xsd">

    <bean id="userDao" class="com.bilibili.dao.impl.UserDaoImpl"></bean>
    <bean id="userService" class="com.bilibili.service.impl.UserServiceImpl"
    p:userName="呜啦啦" p:age="18" p:userDao-ref="userDao"></bean>
</beans>
注入集合属性
先来UserServiceImpl实现类: UserServiceImpl
public class UserServiceImpl implements UserService {
    private String[] myArray;
    private List<String> myList;
    private Map<String,String> myMap;
    private Set<String> mySet;

    public String[] getMyArray() {
        return myArray;
    }

    public void setMyArray(String[] myArray) {
        this.myArray = myArray;
    }

    public List<String> getMyList() {
        return myList;
    }

    public void setMyList(List<String> myList) {
        this.myList = myList;
    }

    public Map<String, String> getMyMap() {
        return myMap;
    }

    public void setMyMap(Map<String, String> myMap) {
        this.myMap = myMap;
    }

    public Set<String> getMySet() {
        return mySet;
    }

    public void setMySet(Set<String> mySet) {
        this.mySet = mySet;
    }
}
然后是xml使用特定标签中注入:
<!--
注入集合属性:
使用set方法注入集合属性:
   array:一般用来设置数组
   list:一般用来设置list集合
   map:一般用来设置map集合
-->
<bean id="userService" class="com.bilibili.service.impl.UserServiceImpl">
    <property name="myArray">
        <array>
            <value>a</value>
            <value>b</value>
            <value>c</value>
        </array>
    </property>
    <property name="myList">
        <list>
            <value>aa</value>
            <value>bb</value>
            <value>cc</value>
        </list>
    </property>
    <property name="myMap">
        <map>
            <entry key="key1" value="value1"></entry>
            <entry key="key2" value="value2"></entry>
        </map>
    </property>
    <property name="mySet">
        <set>
            <value>aaa</value>
            <value>bbb</value>
            <value>ccc</value>
        </set>
    </property>
</bean>bean除了使用xml进行注入,还可以使用注解进行注入,只不过像JdbcTemplate这种依赖中的类(暂时)就只能使用xml文件来配置注入(context标签需要给beans根标签添加命名空间): 使用xml注入JdbcTemplate
<!-- 加载外部jdbc.properties配置文件 -->
<context:property-placeholder location="classpath:jdbc.properties"></context:property-placeholder>
<bean id="jdbcTemplate" class="org.springframework.jdbc.core.JdbcTemplate">
    <!-- 构造器方式注入数据源 -->
    <constructor-arg name="dataSource" ref="dataSource"></constructor-arg>
</bean>
<!-- 静态方法配置dataSource -->
<bean id="dataSource" class="com.alibaba.druid.pool.DruidDataSource" >
    <property name="driverClassName" value="${jdbc.driverClass}"></property>
    <property name="url" value="${jdbc.url}"></property>
    <property name="username" value="${jdbc.username}"></property>
    <property name="password" value="${jdbc.password}"></property>
</bean>
jdbc.properties文件
jdbc.driverClass=com.mysql.jdbc.Driver
jdbc.url=jdbc:mysql://localhost:3306/spring
jdbc.username=root
jdbc.password=root
基于注解的IoC
使用注解方式进行注入时需要给beans标签添加命名空间:
<?xml version="1.0" encoding="UTF-8"?>
<beans xmlns="http://www.springframework.org/schema/beans"
    xmlns:xsi="http://www.w3.org/2001/XMLSchema-instance"
    xmlns:context="http://www.springframework.org/schema/context"
    xsi:schemaLocation="
    http://www.springframework.org/schema/beans
    http://www.springframework.org/schema/beans/spring-beans.xsd
    http://www.springframework.org/schema/context
    http://www.springframework.org/schema/context/spring-context.xsd">
<!-- ↑需要添加context命名空间 -->

    <!-- 配置注解方式扫描的包:在指定的包下进行扫描,如果发现类上面有注解,让其装配到容器中 -->
    <context:component-scan base-package="com.bilibili"/>
</beans>
声明bean的注解:
@Component("beanName"):相当于xml配置的<bean><bean/>标签,注解的value属性值相当于bean标签的id属性,如果不指定value属性,默认bean的id就是类名,首字母小写(Component:组件)<br/>下面三个注解和Component作用一样,只不过更加语义化@Controller:一般用于表现层@Service: 一般用于业务层@Respository: 一般用于持久层
注入相关注解:
@Autowired:自动装配,标注在需要注入的属性上。当使用该注解注入属性时,set方法可以省略,当有多个相同类型的时候,bean的id必须要和属性的名字一致,才能注入成功,否则报错@Qualifier:需要结合@Autowired注解一起使用,在自动注入的基础上,可以给属性注入指定id的bean@Resource:直接注入指定id的bean@Value注解用来给基本类型的属性注入值。可以使用${key}从外部properties配置文件中引入值,需要注意properties配置文件需要在applicationContext.xml中引入
作用范围注解:
@Scope:注解和<bean>标签的scope属性的作用一致。值可以为prototype和singleton(默认)
生命周期注解:
@PostConstruct:声明这个方法是初始化方法,对象被创建的时候调用一次。@PreDestroy:声明这个方式是销毁方法,对象被销毁的时候调用一次。
xml方式和注解方式对比:
| \ | xml | 注解 |
|---|---|---|
| bean定义 | <bean id="" class="" .../> | @Component<br/>衍生:<br/>@Controller<br/>@Service<br/>@Respository |
| bean名称 | 通过id或name属性指定 | 通过上面三个注解的value属性指定 |
| bean注入 | property或p命名空间 | @Autowired按类型注入<br/>@Qualifier配合@Autowired指定<br/>@Resource的name属性,按名称注入 |
| bean作用范围<br/>生命周期 | init-method<br/>destroy-method<br/>scope | @PostConstruct<br/>@PreDestroy<br/>@Scope |
纯注解配置
上面说到像JdbcTemplate这种依赖中的类(暂时)就只能使用xml文件来配置注入,当然也可以使用纯注解进行配置。
主配置:
//声明当前类是一个spring的配置类,用来替代xml配置文件
//获取容器时需要使用AnnotationApplicationContext(@Configuration标注的类.class)
@Configuration
//用于配置容器初始化时需要扫描的包
//和xml配置中<context:component-scan base-package="com.bilibili"/>作用一致
@ComponentScan("com.bilibili")
//导入其他配置类
@Import(JdbcConfig.class)
public class SpringConfig {
    //标注这个方法的返回值作为一个bean并且交给spring容器管理,value属性就是bean的id
    @Bean("jdbcTemplate")
    public JdbcTemplate getJdbcTemplate(@Qualifier("dataSource") DataSource dataSource){
        return new JdbcTemplate(dataSource);
    }
}
外部配置:
//引入外部文件,和<context:property-placeholder location="classpath:jdbc.properties"/>作用一样
@PropertySource("classpath:jdbc.properties")
public class JdbcConfig {
    //使用value注解引用外部变量,这样就不用写死配置了。
    @Value("${jdbc.url}")
    private String url;
    @Value("${jdbc.driverClass}")
    private String driverClass;
    @Value("${jdbc.username}")
    private String username;
    @Value("${jdbc.password}")
    private String password;

    //标注这个方法的返回值作为一个bean并且交给spring容器管理,value属性就是bean的id
    @Bean("dataSource")
    public DataSource getDataSource(){
        DruidDataSource dataSource = new DruidDataSource();
        dataSource.setDriverClassName(driverClass);
        dataSource.setUrl(url);
        dataSource.setUsername(username);
        dataSource.setPassword(password);
        return dataSource;
    }
}
测试类:
public class SpringConfigTest {

    @Test
    public void getJdbcTemplate() {
        //使用AnnotationConfigApplicationContext实现类来获取工厂
        ApplicationContext ac = new AnnotationConfigApplicationContext(SpringConfig.class);
        JdbcTemplate jdbcTemplate = (JdbcTemplate)ac.getBean("jdbcTemplate");
        System.out.println("jdbcTemplate = " + jdbcTemplate);
    }
}
在Junit测试类中注入
在每个单元测试类中,我们都需要获取Spring容器,然后获取要测试的类:
@Before
public void setUp() throws Exception {
    ApplicationContext ac = new ClassPathXmlApplicationContext("applicationContext.xml");
    accountService = (AccountService) ac.getBean("accountServiceImpl");
}
那么能不能直接在测试类中注入要测试的bean呢?
当然是可以。
首先添加依赖:
<dependency>
    <groupId>junit</groupId>
    <artifactId>junit</artifactId>
    <version>4.12</version>
    <scope>test</scope>
</dependency>

<!-- spring5及以上版本要求junit的版本必须是4.12及以上。  -->
<dependency>
    <groupId>org.springframework</groupId>
    <artifactId>spring-test</artifactId>
    <version>5.0.6.RELEASE</version>
</dependency>
然后给测试类配置注解:
//配置spring的单元测试运行器,自动创建spring容器
@RunWith(SpringJUnit4ClassRunner.class)
//配置容器创建时依赖的配置
//xml文件方式,直接给value赋值(注意前缀classpath:)
@ContextConfiguration("classpath:applicationContext.xml")
//纯注解方式,给classes属性赋值
@ContextConfiguration(classes = SpringConfig.class)
public class AccountServiceImplTest {
    //依赖注入
    @Resource(name = "accountService")
    private AccountService accountService;
}然后就可以愉快地在测试类中使用注入的依赖了。依赖少的时候好像并没有方便多少😅
